Introduction
Preservation and Digital Conversion Department
Digital Imaging Lab
Best Practices
Image Capture
The Digital Imaging Lab at Columbia University Libraries adheres to the following practices in the creation of digital surrogates and digital files for use by the University and public. In general, published standards and recommendations (NARA, NISO, FAGDI, etc) are followed. Below is a description of the practices and standards followed by the staff of the Digital Imaging Lab in the creation of digital master files.
Digital Master File
The goal of digital reformatting is to produce a rich digital master image file. The digital master image file has the following attributes (NARA 2004):
1. Digitization is done in a “use neutral” manner, not for any specific output. The image quality parameters are selected to satisfy most types of outputs.
2. The primary objective is to create digital images that look like the original objects and are “reasonable” reproductions without enhancements.
3. Master Image Files document the object at the time of capture, not what it might have once looked like if restored to its original condition.
Color Management
The Digital Imaging Lab is a color-managed environment. Since all devices interpret and display colors differently, the aim of color management is to bring all of the various devices to a defined state. This is accomplished by building a profile of each device’s response to color. For monitors special software is used to measure how it displays certain defined colors, as well as calibrating the monitors white point and brightness to known standards. For cameras and scanners the software measures how the devices record certain defined colors. In all cases the software then creates a look up table (LUT) to correct for any deviation from the defined color. This look up table is usually called the input profile (for cameras and scanners) and display profile (for monitors). A digital color checker target made by X-Rite is used in the creation of the input (camera) profiles at Columbia University.
In order to insure proper color reproduction of our files a color target is associated with the image file. This target is usually an X-Rite Digital ColorChecker target and sometimes a Kodak Q-13 target with scale. For workflow purposes the color file is now associated with the target and usually not incorporated into the image file.
Aimpoints for Photographic Grayscales
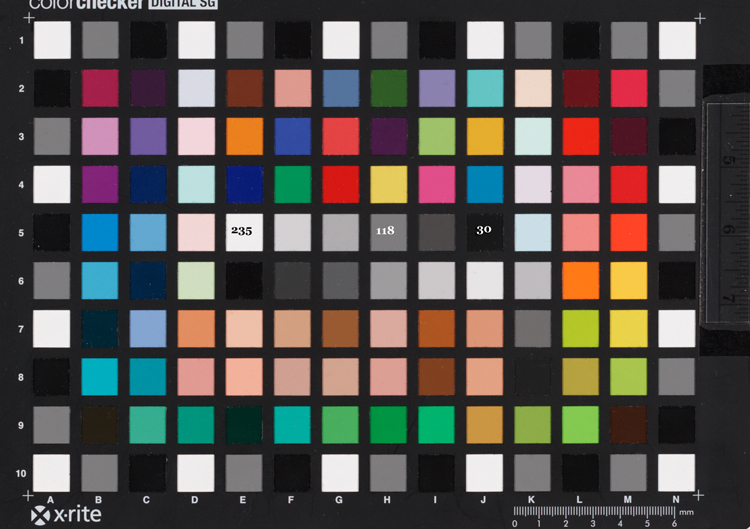
The three values given above (white 235, middle gray 118 and black 30) are guidelines only. The values can vary up or down depending on the object but in general the values should be within 5-10 points of what is given here. For the three points placed at the aimpoint values: there should be no more than +/- 3 RGB level difference in the individual channels within a patch. The image sampler (in Adobe Photoshop or other image processing software) should be set to measure an average of either 5x5 pixels or 3x3 pixels when making these measurements, point sample or single pixel measurements should not be used.
Editing Space
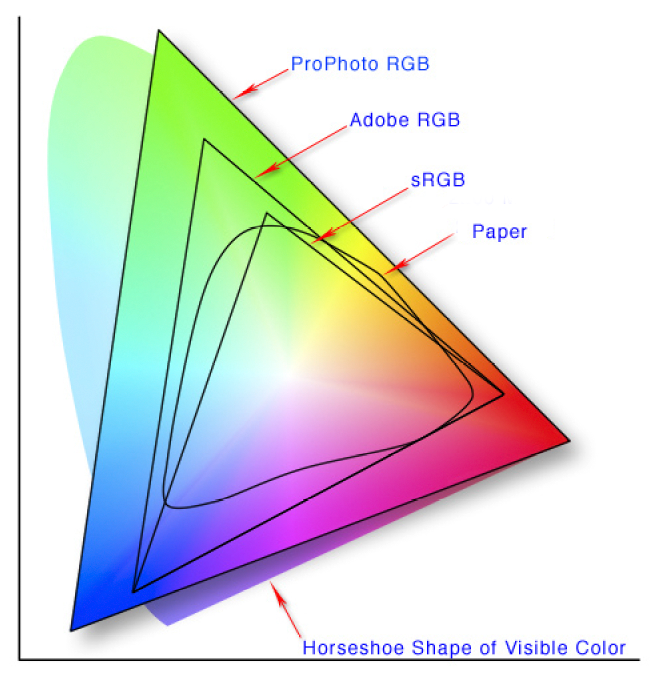
A color model is a mathematical representation of color (such as RGB or CMYK). It is a general system for assigning numbers to color. A color space is an instance of a color model. There are many color spaces such as ProphotoRGB, sRGB, LAB. The important thing to consider in choosing a color space is how much of the visible color spectrum it represents (gamut) and whether it is a well-documented model.
The AdobeRGB (1998) color space was chosen as the common “editing space”. It has a slightly wider gamut than sRGB, the default color model for the web and some printers. Adobe RGB (1998) is well documented and it is in common use in the digital imaging field. Any necessary tonal adjustments of the digital files are made in this specific color model. The Adobe RGB (1998) color space is embedded in every file.
Resolution and Bit Depth
The Digital Imaging Lab captures images as 16 bit files in order to allow for editing of the file without any degradation. Unlike bit depth there is no set resolution for any individual resource or collection. Resolution settings depend on a number of factors (NINCH Guide):
1. The type of information content (text, continuous tone images, maps, etc).
2. The final output for the digital file: screen image or print or both.
3. The needs of the end user.
In keeping with the concept of a rich digital master, resolution should be set with the intent of creating an image file that captures all of the information in the original object but not more in order to keep file sizes reasonable.
Following are resolution values for some typical objects digitized by the Digital Imaging Lab.
Reflective Material (Photographs, Drawings, Paintings, etc.):
5 x 7 or smaller 600 ppi
8 x 10 400 ppi
11 x 14 or larger 300 ppi
Transmissive Material (Negatives, Transparencies, Glass Plates, etc.):
35mm:
Color 2800 ppi
Grayscale 2800 ppi
4 x 5:
Color 1200 ppi
Grayscale 1800 ppi
8x10 or larger:
Color 900 ppi
Grayscale 900 ppi
Technical Metadata:
To facilitate the preservation of the digital files created in the Digital Imaging Lab technical metadata about the digital files is recorded. A majority of the basic image information (resolution, color space, bit depth, etc.) is captured in the EXIF (Exchangeable Image File Format) files and can be viewed in Photoshop’s File Browser.
The Image Production values recommended by the NISO Z39.87 standard need to be recorded manually. The Digital Imaging Lab embeds the following environmental technical metadata into the image file:
Host Computer
OS
OS Version
Image Producer
Camera/Scanning Back Manufacturer
Camera/Scanning Back Model Name
Camera/Scanning Back Software
Scene Illuminant
Camera Body
Camera Lens
Target Type
Best Practices
Post Processing
Procedures:
Inventory:
For large imaging projects where you will most likely have large batches of images to work with:
1. Check to see that the number of files on the batch spreadsheet matches the number of files in the directory. Use “Print Folders” to create a directory listing of the image files and import to the batch spreadsheet and check to see that there is a 1:1 correspondence.
2. Check to see that file names in the image directory matches the filename on the spreadsheet. Rename if necessary.
Quality Control:
1. Open the directory of images in Adobe Bridge and go to the Metadata window. Check that files have the proper ICC profile, resolution and bit depth.
2. Open image and view at 100%. Scroll through entire image using either the Navigator in Photoshop or the Hand Tool. Look for any dirt, hair, and digital artifacts. For large imaging projects later batches can be sampled at 10% after performing a cursory overview of the whole image batch in Adobe Bridge.
3. Check color target for any color bias and perform any minor color corrections. This should rarely be necessary. If there is a significant colorcast consult with the photographer and/or manager of the Imaging Lab. The color targets should always remain associated with the respective file and should always be kept within the same directory as the image files when moving the images to the archive server (/fstore/).
Optimized Master Files
From FAGDI Guidelines (2010):
There is a common misconception that image files saved directly from a scanner or digital cameras are pristine or unmolested in terms of the image processing. For almost all image files this is simply untrue. Only “raw” files from scanners or digital cameras are unadjusted, all other digital image files have a range of image processing applied during scanning and prior to saving in order to produce digital images with good image quality. Because of this misconception, many people argue you should not perform any post-scan or post-capture adjustments on image files because the image quality might be degraded. We disagree. The only time we would recommend saving unadjusted files is if they meet the exact tone and color reproduction, sharpness, and other image quality parameters that you require. Otherwise, we recommend doing minor post-scan adjustment to optimize image quality and bring all images to a common rendition. Adjusting master files to a common rendition provides significant benefits in terms of being able to batch process and treat all images in the same manner.
Service files were copies of the original master tiffs that were cropped and edited and saved. The original tiff files were never to be touched. But this took up extra storage space and energy to track and maintain. The FAGDI guidelines suggest that this was never really necessary or appropriate and what is needed is an optimized master file.
Much of the image editing and processing needed to create an optimized Master File can be done at the RAW processing stage. These processes include: cropping, deskewing, tonal corrections and unsharp masking. In cases where the camera or imaging device does not capture in RAW these processes will be done post capture. The photographer in this case should do his best to produce a tiff file that will need little if any cropping, deskewing or tonal correction. These should be done at the capture stage.
When using the Unsharp Mask Filter in Photoshop, it is best to do so in the LAB color space to avoid any yellowish colorcast that sometimes occurs. To do this:
A. Go to Image-Mode-LAB Color
B. In the Channels palette, select the Lightness channel.
C. Apply Unsharp Mask
D. Convert the file back to the AdobeRGB(1998) color space. Go to Image-Mode-RGB. It should automatically default to this color space. If it does not check your color settings in Photoshop to see that AdobeRGB is set as the working space and then go to Edit-Convert to profile-AdobeRGB (1998).
When applying Unsharp Mask the radius settings should always be less than 1. Usually between 0.3 and 0.6. The Amount should be anywhere between 80 and 200. The threshold is usually between 0 - 6.
The optimized Master File should meet all the criteria set forth above and have an associated color target. This file will easily convert to whatever file format is necessary (jp2, jpeg) with minimal (re)processing and without the need for a separate “service” copy.